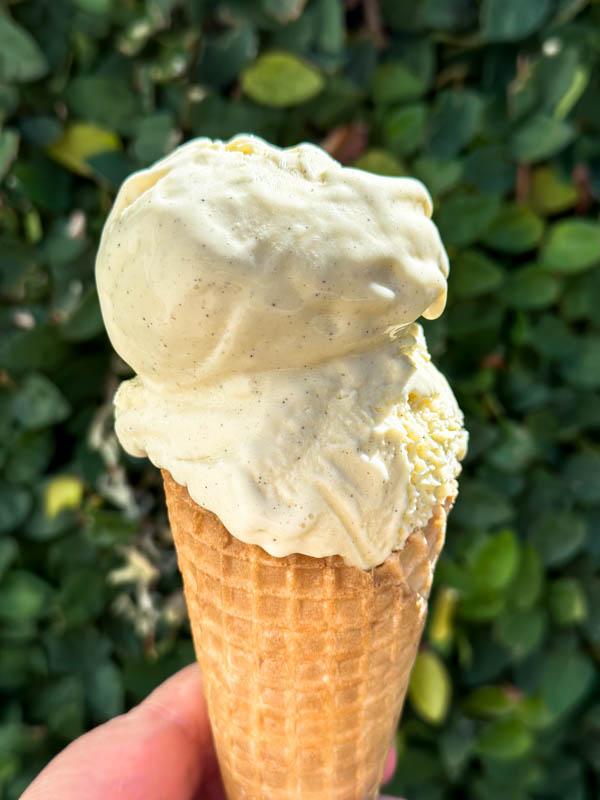
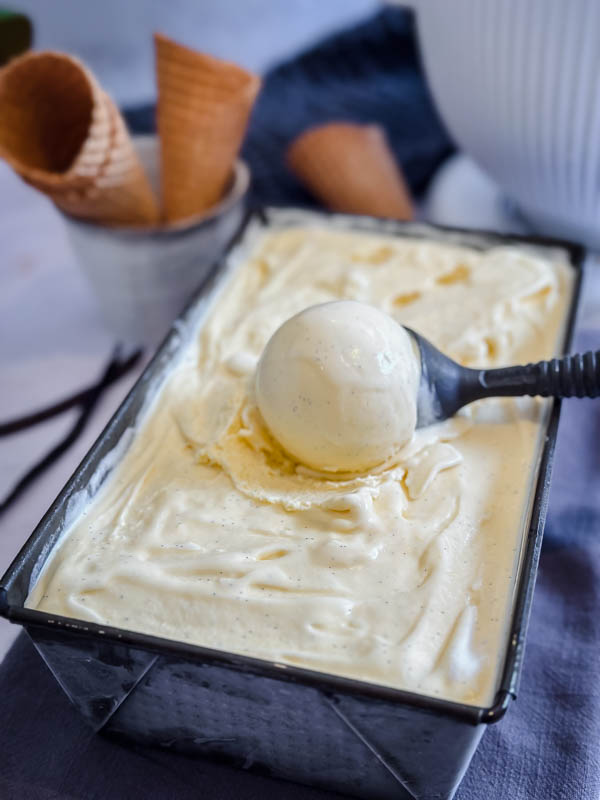
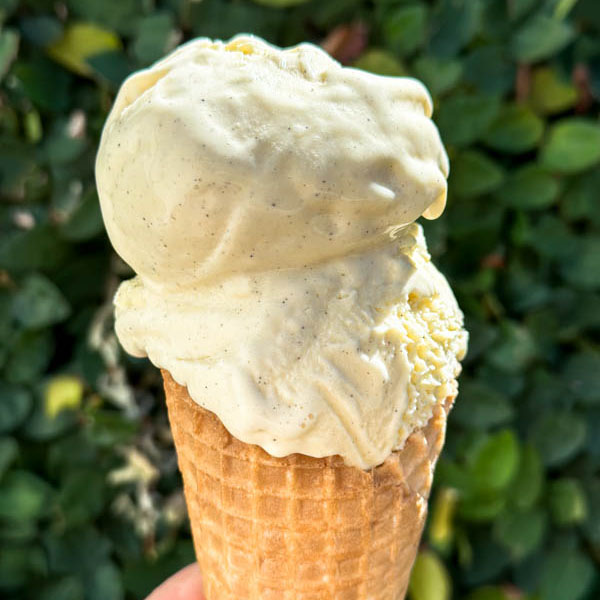
If you are new to ice cream making or are looking for a good quality vanilla bean ice cream recipe then you are in the right place. This is my favourite tried and tested recipe that I have been making for years and it always delivers a perfect result. Made in an ice cream maker, it combines an egg custard base of cream, milk, eggs, sugar with vanilla bean and vanilla paste or extract. It has a wonderful smooth and creamy texture with great vanilla flavour as a result of using a whole vanilla bean and extra vanilla bean paste. While this ice cream is delicious as it is (or accompanied with other desserts), I have also given suggestions for you to create different flavours using this recipe as a base.
While there are a lot of ‘quick’ ice cream methods that don’t require a custard base, if you are after a creamy indulgent ice cream, then using a cooked custard (creme anglaise) base is the way to go. Once you have mastered this vanilla ice cream, you can also create all sorts of wonderful flavoured ice creams using this recipe as a base and adding other ingredients to it. I have given a few suggestions below including two of my favourite flavours – a Chocolate Brownie and Cherry Ice Cream and a Gingernut and Marmalade Ice Cream.
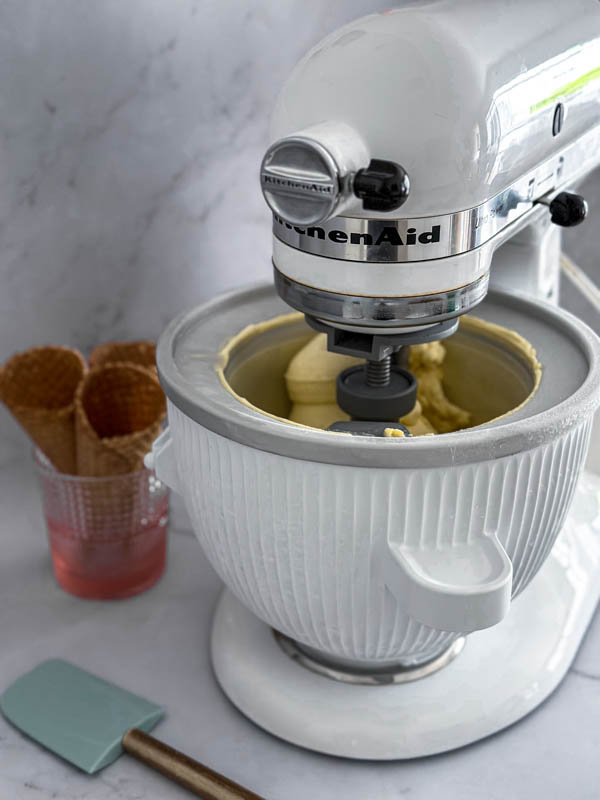
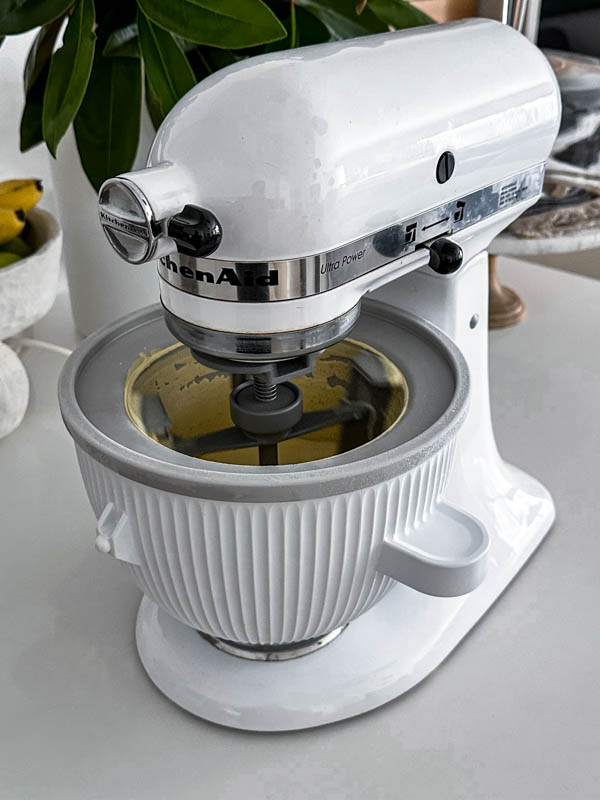
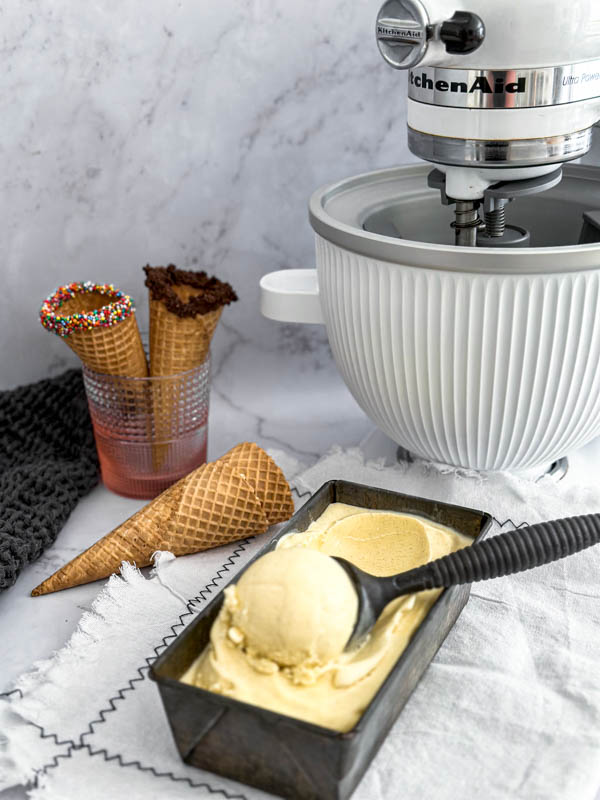
For this recipe you will require an ice cream maker. I am using the Ice Cream Maker attachment from KitchenAid which is a fantastic addition to your stand mixer. It is very easy to attach and use.
Before you make this recipe, please read the ‘Tips and Tricks for Success’ section below. I have provided a comprehensive guide with some handy tips to help you succeed. Ice cream making is not hard but it does require planning ahead. I recommend you start this recipe the day before you serve as you need to factor in chilling time of the custard base and freezing time of the ice cream. All this is covered in this section. So, on to the recipe…
Why I love this recipe:
While a traditional custard base can be slightly more time consuming than some of the ‘quick’ versions out there, it does make a more authentic ice cream which is really smooth and creamy. This decadent ice cream recipe has a similar texture and vanilla flavour to the quality brands you can buy.
I also love that you can create lots of different flavoured ice creams using this recipe as a base. I have so much fun doing this and I think you will too!
Ingredients to make this recipe:
- Cream – use a pouring or thickened cream
- Full Cream Milk – use full cream milk but not low fat
- Vanilla – this recipe uses both a vanilla bean (split down the middle and scrape out the seeds), as well as extra vanilla paste or extract.
- Eggs – just the egg yolks are used in this recipe. Save and freeze the egg whites for use in meringues, etc.
- Sugar – I always use caster sugar as it is finer and dissolves better than granulated sugar.
Step by Step Instructions:


Please read the ‘Tips and Tricks for Success’ section below before starting this recipe. Also remember that your ice cream maker bowl must be placed in the freezer for 24 hours prior to making this recipe (check manufacturers instructions). I like to leave mine in the freezer for 24 hours regardless.
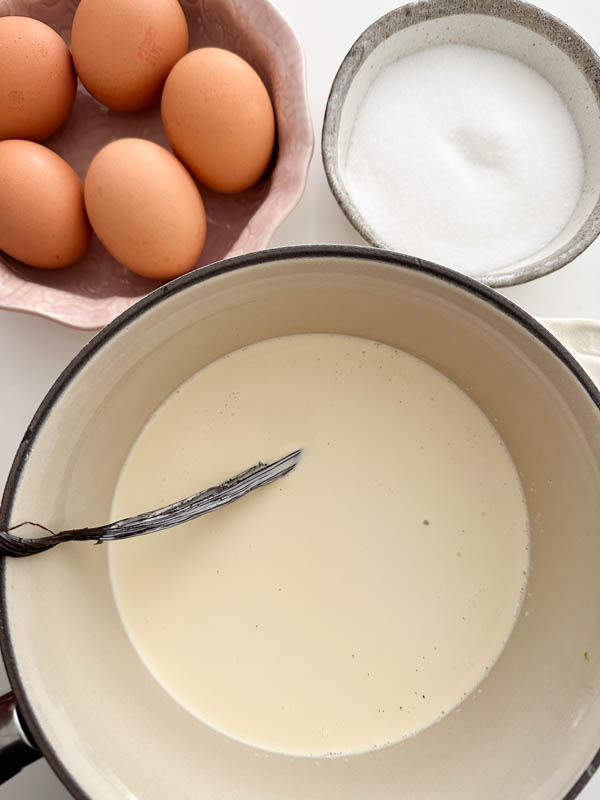
- 1.Get all the ingredients out and measured. The ingredients required to make this recipe include cream, milk, vanilla (a vanilla bean and vanilla bean paste), egg yolks and caster sugar. To start, place the cream, milk and vanilla into a medium sized heavy based saucepan. If using a vanilla bean, slice it down the middle and scrape all the seeds out. Add both the seeds and scraped out vanilla pod to the pot. Place the saucepan over a low to medium heat until it just starts to simmer. Do not let the mixture boil, so keep an eye on it.
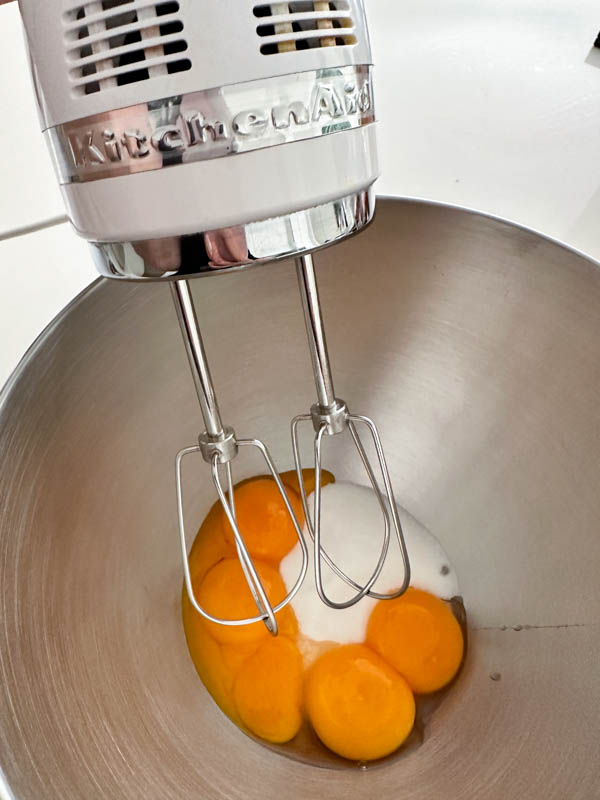
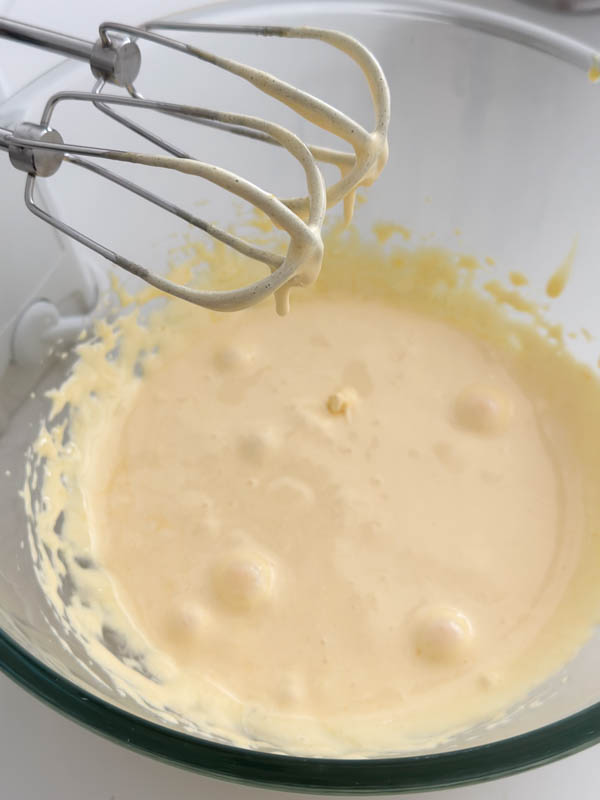
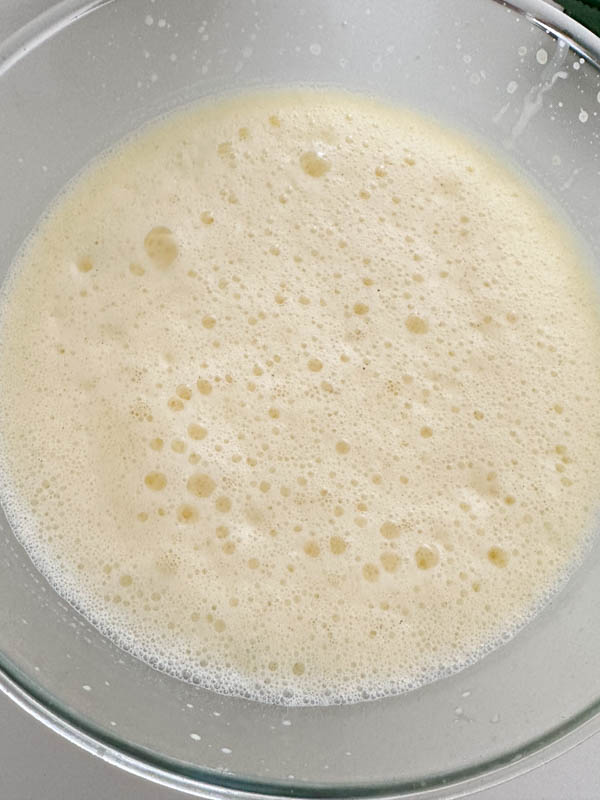
- 2,3,4. While the cream mixture is heating up, immediately start beating the egg yolks and sugar. Place them into a bowl and, using a hand held beater (or similar), beat until they become pale and thick. This will only take a couple of minutes.
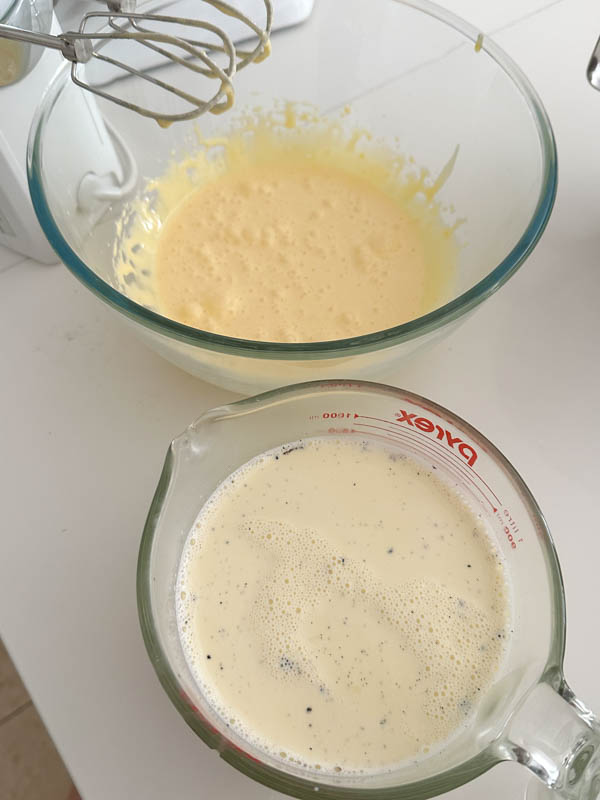
- 5,6. Once the cream mixture just starts to simmer, remove the vanilla bean pod (don’t discard) and slowly start pouring the cream into the egg mixture, whisking the whole time until combined.
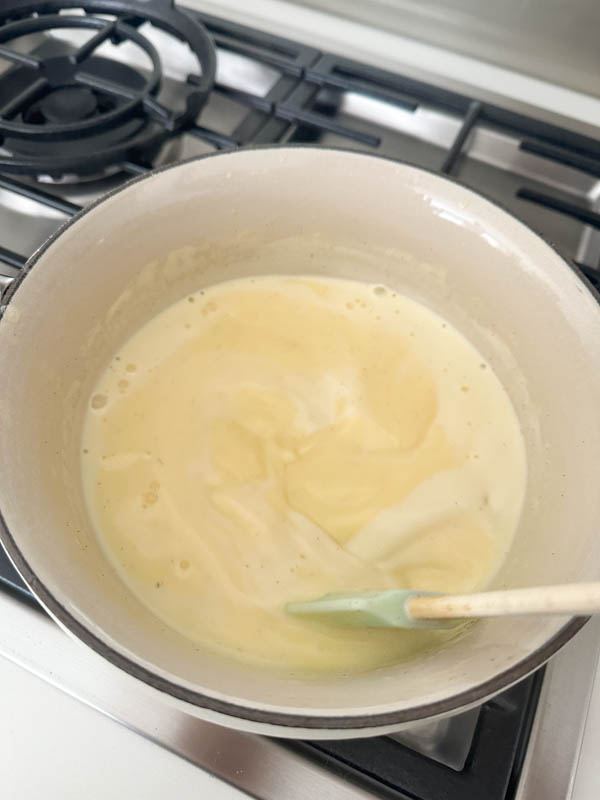
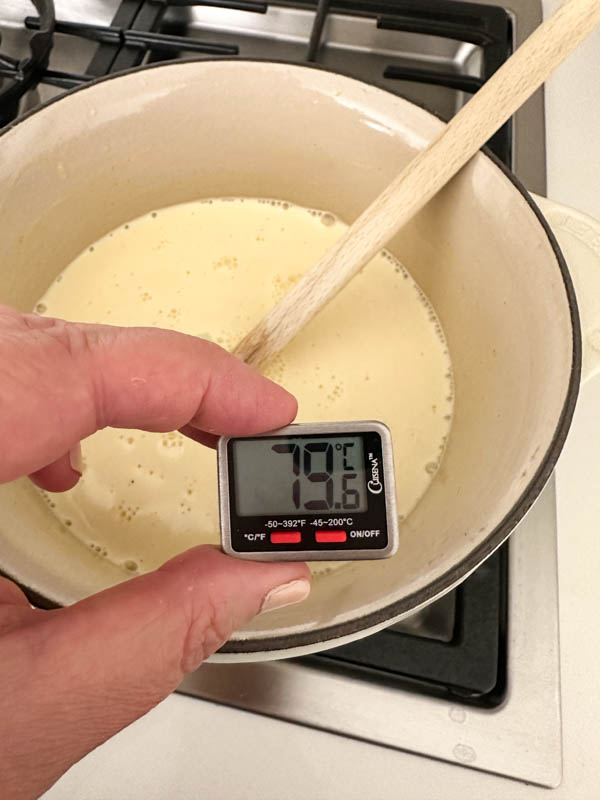
- 7,8,9. Return the combined mixture back into the saucepan along with the vanilla bean pod and place over a low heat. This next step requires all of your concentration for the next 20-30 minutes as you now need to constantly stir the custard until it starts to thicken to avoid it sticking to the bottom and splitting/scrambling. It is important to keep stirring until the custard reaches 78-80 degrees Celsius or coats the back of a spoon. To test, coat the back of a spoon with custard and then run a finger down the middle – if it leaves a line then the custard is ready. It will take approximately 20-25 minutes for the custard to be ready – please don’t be tempted to increase the heat to speed up this process as you will risk scrambling the mixture and will have to start over.
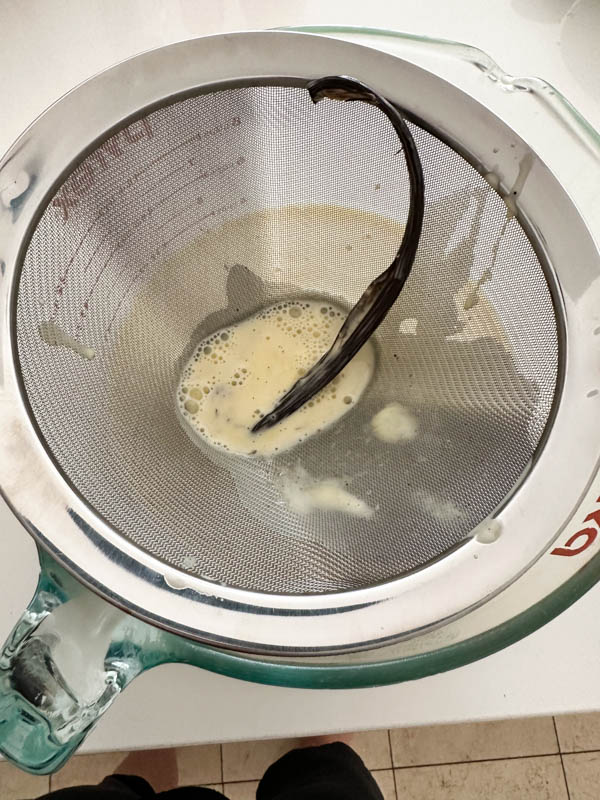
- 10. Remove from the heat immediately and strain the mixture through a fine sieve into a bowl or wide jug. This will ensure a nice smooth mixture.
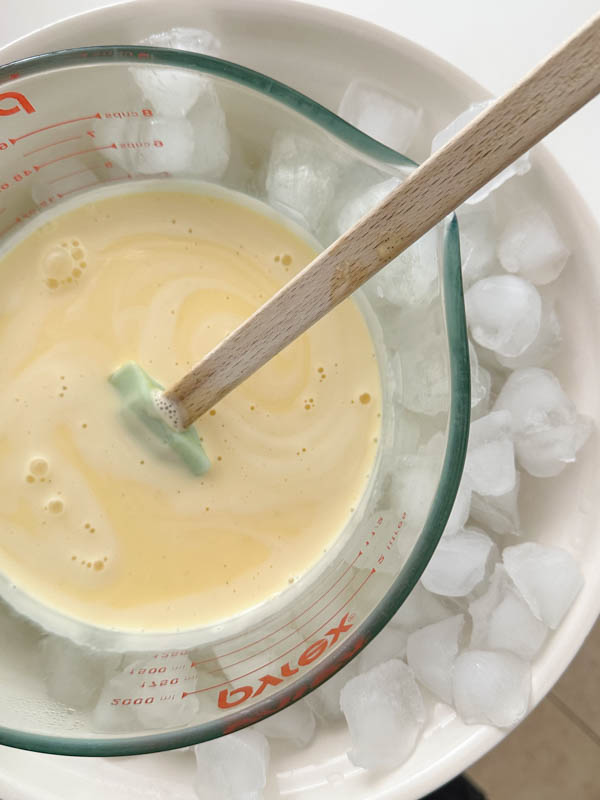
- 11. This step is optional but one I like to do. To help speed up the cooling down process, place the bowl of custard into an ice bath and stir frequently. Otherwise, set the custard aside and allow it to come to room temperature stirring occasionally.
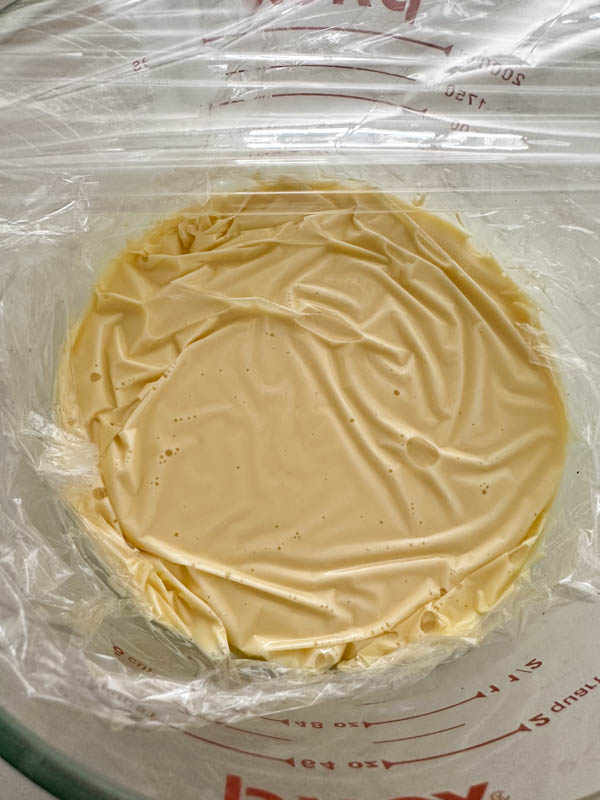
- 12. Once the custard has cooled to room temperature, place a layer of cling wrap directly onto the surface of the custard to stop a skin from forming. Then place more cling wrap over the bowl or jug to seal and place into the fridge until well chilled. The colder the mixture is the better. I recommend chilling overnight however you can chill for at least 4 hours if you want to make ice cream the same day.
- 13,14. To churn the custard into ice cream, follow the manufacturers instructions on your ice cream maker. Mine took 20 minutes to be ready but timing will vary depending on your machine and how well chilled your bowl and mixture is. Take the Ice Cream Maker bowl out of the freezer and attach according to manufacturer’s instructions. Start the Ice Cream Maker before you start pouring in the custard, ensuring the blade is moving. Slowly pour in the custard and allow the mixture to churn for the recommended time.
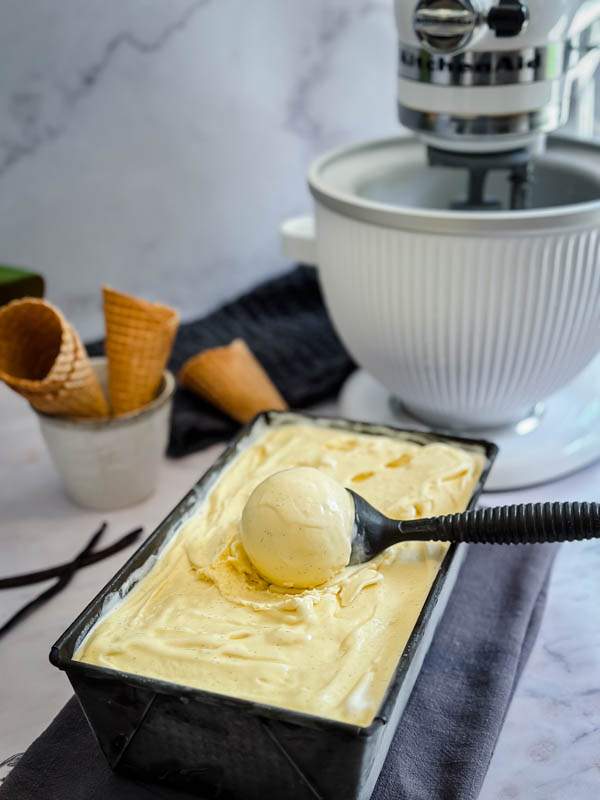
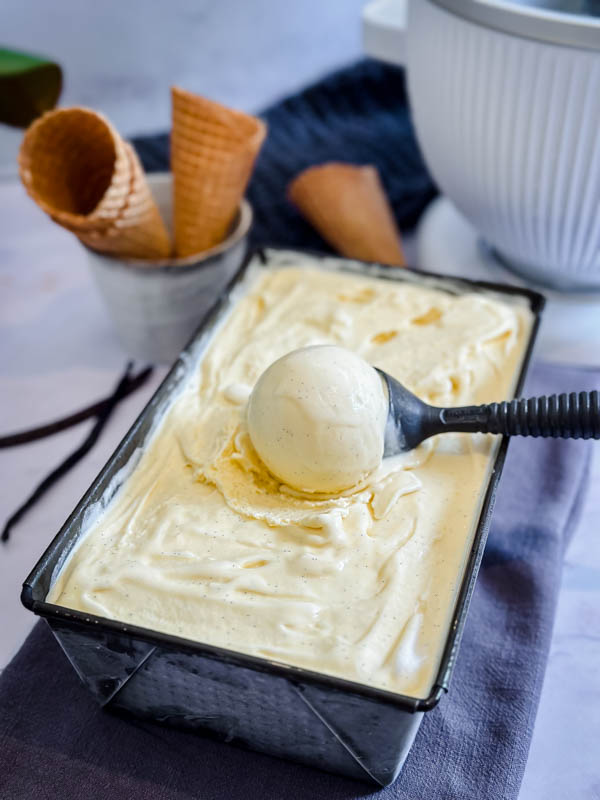
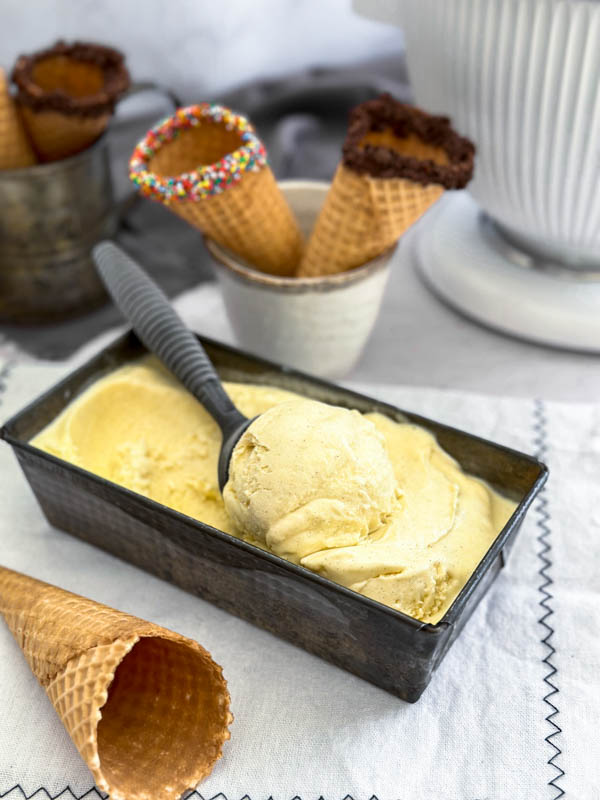
- 15. Once it is ready it should be a soft but spoonable consistency. Spoon into a container with an airtight lid and store in the freezer for an extra 2-4 hours before serving. This will allow the ice cream to firm up more. Enjoy!
Tips and Tricks for Success:
I highly recommend you read this section before embarking on this recipe. While the process of making ice cream is easy, there are definitely some tips that will help you.
- Firstly always plan ahead as the process of making ice cream takes a bit of time. I recommend you do this over 2 days i.e., make the custard base the first day, chill overnight and then the following day simply churn and freeze. If you are using a bowl that requires freezing beforehand, you will need to pop this into the freezer for at least 24 hours beforehand (or according to the manufacturers instructions). Make sure you sit the ice cream maker bowl upright in your freezer so the embedded freezing particles inside the bowl are evenly distributed around it.
- The reason I recommend making the custard base the day before is so that it can come to room temperature before putting it in the fridge overnight to chill. If you really want to make it on the same day, I would recommend chilling it in the fridge for at least 4 hours.
- Making the custard base is not a difficult process. If you have made a custard before, you will know that when it is put on the heat it requires constant stirring until it thickens (over a low heat this can take 20-25 minutes). The first step is to whisk the egg yolks and sugar. I recommend using a hand held electric beater or stand mixer (makes life easier), but you can use a wire whisk. Make sure you beat the egg mix until it thickens and becomes pale in colour.
- When heating the cream mixture, use a heavy bottom saucepan as this conducts heat better and is less likely to stick when making custards. I also recommend using a flat edged wooden spoon or spatula as this helps stir the mixture on the bottom of the pan.
- The cream mixture should only be heated until small bubbles start to form around the edges. Do not let the mixture come to a boil.
- Make sure you start whisking the eggs and sugar as soon as you have put the cream mixture on to the heat so you have plenty of time to get the eggs beaten before the cream mixture is heated through.
- Once the eggs are whisked and the cream mixture is heated through, remove the vanilla bean pod from the cream and set it aside (do not discard it yet as you will be adding it back later to allow it to infuse even more vanilla flavour into the custard base). When pouring the cream mixture into the eggs, do this slowly and make sure you are whisking the whole time.
- When the custard is put back onto a low heat, make sure you are constantly stirring the mixture now until it thickens – this is really important and requires your full attention to avoid the mixture scrambling/separating. It will take 15-25 minutes so be patient, keep stirring and do not be tempted to increase the heat. To test if the mixture is ready, you can do one of two things: the most precise way which I always do is to use a thermometer – the ideal temperature when ready is between 77-80 degrees Celsius. Otherwise you can test it by coating the back of the spoon with mixture then run your finger through it. If the finger mark stays then the mixture is ready. Remove from the heat straight away.
- Another important step when making ice cream is to strain your custard mixture once it is made. Simply strain through a fine sieve into a clean bowl or jug. Some recipes don’t include this step but it is one I always do as it will create a smooth mixture without any tiny lumps.
- Allow the mixture to cool completely to room temperature (stirring occasionally) before continuing to chill it in the fridge for at least 4 hours (but ideally overnight). Once it has cooled to room temperature, place a piece of cling film directly onto the surface of the custard to cover which will stop a skin from forming. Then cover the bowl itself with cling film to seal before placing in the refrigerator. Chilling the ice cream base overnight is recommended.
- To speed up the cooling process before it goes into the fridge, I use an ice-bath to cool down my mixture to room temperature quickly. Simply place the bowl with the mixture in it into an ice-bath and stir often until chilled. This will cool your mixture down in about 20-30 minutes. Now cover as above and place in the fridge to chill.
- The following day when making the ice cream, always read the manufacturers instructions.
- Once churned and ready, the ice cream is a soft but spoonable consistency, so you will need to freeze your ice cream for at least 2-4 hours before using to allow it to firm up more. Alternatively, leave it in the freezer overnight and remove from the freezer for 5-10 minutes before serving. Make sure the container you freeze it in is airtight to avoid any ice crystals from forming on top of your ice cream.
- If adding any additional ingredients to flavour your ice cream, do this in the last few minutes of churning, or you can mix them through using a large spoon at the end.
- Enjoy!
Flavoured Ice Cream Suggestions:
Now that you have made and mastered this Vanilla Bean Ice Cream recipe, you can have some fun adding your favourite ingredients to create lots of different flavour combinations. The choices are endless! Here are some suggestions including two of my favourites:
- Chocolate Brownie and Cherry Compote Ice Cream – to make this flavour I use brownie crumbs (simply blitz brownie in a food processor) and a cherry compote (like a jam but not as set). I fold them through my vanilla bean ice cream. It really is a wonderful combination! I will be providing my full recipe for this in a separate post soon including which store bought compote I love using and which brownie mix I use to make this recipe easy (and it’s GF).
- Gingernut and Orange Marmalade Ice Cream – a real favourite of ours. If you aren’t a marmalade fan you can substitute with Apricot Compote or Jam. To make this one, I blitz gingernut biscuits in a food processor and mix them through the vanilla bean ice cream along with Orange Marmalade. I will be sharing my full recipe for this one too very soon including my favourite Blood Orange Marmalade.
- Cookies and Cream Ice Cream – always a popular flavour with adults and children. Simply blitz Oreo cookies in a food processor until crushed but with some slightly bigger pieces. Fold through the vanilla bean ice cream. Making your own is so much fun and you can really load up on the flavour.
Ice Cream Cones:
Have some fun with these too. In these photos, I have dipped the cones in melted chocolate and then dipped them in ingredients that I have used in the ice cream flavour.
The first one in the photo is dipped into some of the chocolate brownie crumbs and the second one is dipped into ‘hundreds and thousands’.
Equipment
- Ice Cream Maker
- medium sized heavy based saucepan
- 2 Large bowls
Ingredients
- 500 ml cream (2 cups) pouring or thickened cream
- 250 ml full cream milk (1 cup)
- 1 vanilla bean pod split in half and seeds scraped out
- 1 tsp vanilla bean paste or extract
- 5 egg yolks large
- 110 g caster sugar (1/2 cup)
Instructions
- Before starting this recipe, please read all my 'Tips and Tricks' in the notes below. Ensure your ice cream maker bowl has been in the freezer for at least 24hrs beforehand (or follow manufacturer's recommendations).
- Put the egg yolks and caster sugar into a large bowl and set aside.
- In a heavy based medium sized saucepan, pour in the cream and milk. Split the vanilla pod down the middle with a sharp knife and scrape out all the seeds (I use the back of the knife to scrape out the seeds). Add the seeds and vanilla pod to the cream along with the vanilla bean paste. Stir everything together and place over a low to medium heat until mixture just starts to simmer. Do not let it boil.
- Meanwhile, beat the egg yolks and sugar together in the bowl using a hand held beater or stand mixer until thick and pale in colour. This should only take a couple of minutes. Remove the vanilla pod from the cream mixture and slowly pour the cream into the egg mixture, whisking the whole time until combined. Add the vanilla pod back in and pour the mixture into the saucepan.
- Return the pan to a low heat and cook the custard, stirring constantly with a wooden spoon until it is thick enough to coat the back of the spoon (see tips for how to do this). Another way to check if it is ready is when it reaches a temperature of between 77-80 degrees Celsius. This can take 15-25 minutes. Once ready, remove from the heat immediately.
- Strain the custard mixture through a fine sieve into a bowl or large jug. Discard the vanilla pod. Set custard aside and allow to come to room temperature, stirring occasionally. To cool this down more quickly, you can use an ice bath (see notes). Once at room temperature, place a piece of cling film directly onto the surface of the custard to cover – this prevents a skin from forming. Use more cling film to cover the bowl and place in the fridge for at least 4 hours, ideally overnight, until well chilled.
- Set up your ice cream maker (follow manufacturer's instructions) and while the machine blade is running, slowly pour in the chilled custard. Leave it to churn for 15 to 30 minutes (or according to the manufacturer's instructions) until it is a soft but spoonable consistency.
- At this stage, the ice cream is ready but still too soft to serve, so spoon it into an airtight freezer proof container and seal. Freeze for 2-4 hours or overnight. Remove from the freezer for 5 minutes before serving. This recipe makes approximately 800ml of ice cream. Best eaten within 2 weeks.
Notes
Tips and Tricks for Success:
I highly recommend you read this section before embarking on this recipe. While the process of making ice cream is easy, there are definitely some tips that will help you.- Firstly always plan ahead as the process of making ice cream takes a bit of time. I recommend you do this over 2 days i.e., make the custard base the first day, chill overnight and then the following day simply churn and freeze. If you are using a bowl that requires freezing beforehand, you will need to pop this into the freezer for at least 24 hours beforehand (or according to the manufacturers instructions). Make sure you sit the ice cream maker bowl upright in your freezer so the embedded freezing particles inside the bowl are evenly distributed around it.
- The reason I recommend making the custard base the day before is so that it can come to room temperature before putting it in the fridge overnight to chill. If you really want to make it on the same day, I would recommend chilling it in the fridge for at least 4 hours.
- Making the custard base is not a difficult process. If you have made a custard before, you will know that when it is put on the heat it requires constant stirring until it thickens (over a low heat this can take 20-25 minutes). The first step is to whisk the egg yolks and sugar. I recommend using a hand held electric beater or stand mixer (makes life easier), but you can use a wire whisk. Make sure you beat the egg mix until it thickens and becomes pale in colour.
- When heating the cream mixture, use a heavy bottom saucepan as this conducts heat better and is less likely to stick when making custards. I also recommend using a flat edged wooden spoon or spatula as this helps stir the mixture on the bottom of the pan.
- The cream mixture should only be heated until small bubbles start to form around the edges. Do not let the mixture come to a boil.
- Make sure you start whisking the eggs and sugar as soon as you have put the cream mixture on to the heat so you have plenty of time to get the eggs beaten before the cream mixture is heated through.
- Once the eggs are whisked and the cream mixture is heated through, remove the vanilla bean pod from the cream and set it aside (do not discard it yet as you will be adding it back later to allow it to infuse even more vanilla flavour into the custard base). When pouring the cream mixture into the eggs, do this slowly and make sure you are whisking the whole time.
- When the custard is put back onto a low heat, make sure you are constantly stirring the mixture now until it thickens – this is really important and requires your full attention to avoid the mixture scrambling/separating. It will take 15-25 minutes so be patient, keep stirring and do not be tempted to increase the heat. To test if the mixture is ready, you can do one of two things: the most precise way which I always do is to use a thermometer – the ideal temperature when ready is between 77-80 degrees Celsius. Otherwise you can test it by coating the back of the spoon with mixture then run your finger through it. If the finger mark stays then the mixture is ready. Remove from the heat straight away.
- Another important step when making ice cream is to strain your custard mixture once it is made. Simply strain through a fine sieve into a clean bowl or jug. Some recipes don’t include this step but it is one I always do as it will create a smooth mixture without any tiny lumps.
- Allow the mixture to cool completely to room temperature (stirring occasionally) before continuing to chill it in the fridge for at least 4 hours (but ideally overnight). Once it has cooled to room temperature, place a piece of cling film directly onto the surface of the custard to cover which will stop a skin from forming. Then cover the bowl itself with cling film to seal before placing in the refrigerator. Chilling the ice cream base overnight is recommended.
- To speed up the cooling process before it goes into the fridge, I use an ice-bath to cool down my mixture to room temperature quickly. Simply place the bowl with the mixture in it into an ice-bath and stir often until chilled. This will cool your mixture down in about 20-30 minutes. Now cover as above and place in the fridge to chill.
- The following day when making the ice cream, always read the manufacturers instructions.
- Once churned and ready, the ice cream is a soft but spoonable consistency, so you will need to freeze your ice cream for at least 2-4 hours before using to allow it to firm up more. Alternatively, leave it in the freezer overnight and remove from the freezer for 5-10 minutes before serving. Make sure the container you freeze it in is airtight to avoid any ice crystals from forming on top of your ice cream.
- If adding any additional ingredients to flavour your ice cream, do this in the last few minutes of churning, or you can mix them through using a large spoon at the end.
- Enjoy!
Nutrition


No Comments