This one bowl Chocolate Cake is a winner and is so easy to make. It is full of chocolate flavour with a beautifully moist and tender crumb and is my go-to favourite recipe for birthdays or celebrations. A cake that both adults and children will enjoy.
Grease and line the base and sides of 2 x 20cm cake tins with butter and baking paper. Set aside. Preheat the oven to 180°C (350°F).
In a large mixing bowl, sift together the flour, cocoa, baking powder and baking soda. Add the sugar and salt and stir everything together to combine.
Now add all the wet ingredients (oil, buttermilk, eggs and vanilla extract) except for the boiling water. Use a whisk or hand held mixer to mix everything together well until smooth and the eggs are fully incorporated.Add the boiling water (or coffee) and whisk again until everything is combined. The batter will be very runny but that is how it is supposed to be.
Pour batter evenly into cake tins.
Bake in the oven for 35-40 minutes or until a skewer inserted into the middle of the cake comes out clean. You can bake both tins at the same time on the same shelf or bake them separately.Remove the tins from the oven and set aside to cool for 20 minutes before turning out carefully onto a wire cake rack to cool completely. Cakes must be completely cool before frosting. At this stage you can place the cakes into an airtight container and put in the fridge overnight. Otherwise once cooled, you can decorate.
To Make Buttercream:
Sift together the icing sugar and cocoa in a bowl and set aside.
Place the softened (room temperature) butter into the bowl of a stand mixer or you can use a hand held mixer. For the stand mixer, use the paddle attachment.Beat the butter on medium speed 6 for 3-4 minutes until pale. Scrape down the sides.
Add approximately half of the icing sugar/cocoa mixture and beat again for another 3-4 minutes - start on speed 1 for first few seconds (to stop icing sugar from spraying out) and then increase to speed 6. Scrape down the sides and then repeat with the remaining icing sugar/cocoa mixture for another few minutes. Scrape down the sides again and then add the milk and vanilla extract and beat on speed 6 for another 1-2 minutes until combined and creamy. Scrape down the sides once during this final mixing.
To Frost the Cakes:
Firstly I suggest that you trim the top of both cakes so that they are flat and even. I find this easier to do when the cakes have been refrigerated for a few hours or overnight.
Place the first cake onto your cake plate and spread with a thin amount of strawberry or apricot jam (optional). Then spread with a thin layer of Buttercream frosting.Now place the second cake upside down onto the first layer, so that the bottom of the second cake is now the top of the cake. The reason I do this, is that the bottom of the cake is always smoother and flat than the top.
Frost the sides of the cake first using a flat palette knife to apply and smooth as you go. Once the sides are frosted, apply a generous amount of buttercream to the top of the cake and smooth out. Use a damp clean cloth to carefully remove any messy bits of buttercream on the plate.Decorate the cake as you like. You can also choose to fill the cake with a generous layer of jam and whipped cream and then finish the top layer off with a ganache and fresh raspberries. Or serve the cake simply, as it is, with a dusting of icing sugar and a side of whipped cream or ice cream.
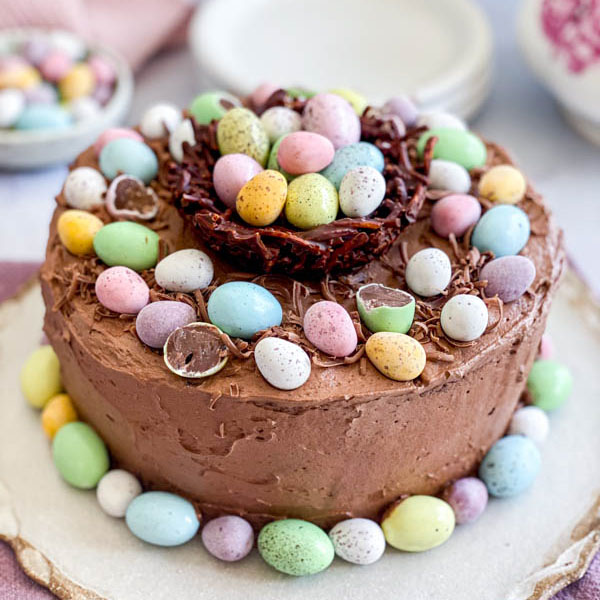
To decorate for Easter:
Once the cake is frosted, add some grated milk chocolate to the top of the cake to form a ring around the outside. Add some mini easter eggs (see step by step instructions) and place around the cake on top of the grated chocolate.Decorate with larger eggs in the centre, or add a pre-made Easter Chocolate Nest to the centre and fill with more mini eggs. Add more mini eggs around the base of the cake.Chocolate Nest: The recipe for the Easter Chocolate Nests used to decorate my Easter themed Chocolate Cake can be found here.
Notes
Nutritional values are based on cake and buttercream only. However you may not necessarily use all the buttercream in this recipe.Cooking times for this recipe is just for the making of the cake and does not include making of the frosting or decorating times as that will vary depending on how you choose to present it.
Tips and Tricks for Success:
The recipe for this cake is very forgiving. As it is made with oil and not butter, you get a lovely moist cake.The cake only uses cocoa and no chocolate but by adding boiling water to the batter, it helps the cocoa 'bloom' which enhances the chocolate flavour in this cake. When the boiling water is added to the mix, it will create a more runny batter. Don't be concerned as it is supposed to be a thinner mixture than would normally be the case.Always grease and line your tins with butter and baking paper. It really makes all the difference and avoids any sticking, especially with moist cakes such as this one. If using springform tins, I highly recommend you line the sides as well. This helps seal the sides and avoids any leakage when filling with thin batters like this one.I also like to use regular cocoa powder in this recipe as it is less bitter than Dutch cocoa.For a nice finish, I recommend trimming the tops of your cakes to get a nice flat finish. Also turn the top cake upside down once it has been trimmed, as the bottom of the cake will always be flatter and smoother giving the cake a nice flat finish on top.
Recipe Variations:
You can make this recipe in different sized tins so I have provided a few cooking times for different sized tins. The temperature of 180°C (350°F) remains the same.
Cupcakes - I recommend you use cupcake liners. Fill 2/3 with batter and bake for approximately 25 minutes.
Single cake in a 22-24cm (9-10inch) - 40-45 minutes approximately.
2 x 22cm (9inch) tin - 35 minutes approximately.
Bundt Pan - grease and flour your tin well! 50 mins approximately.
One layer traybake cake in a 9 x 13inch (22cm x 33 x 5cm) - 35-40 minutes.
All times are approximate. Check your bakes a few minutes before these times.